Your cat flinches the second you reach for the clippers, and suddenly a two-minute job turns into a wrestling match. If you’ve ever ended up with scratches on your hands and a cat hiding under the bed, you’re not alone. Learning how to trim cat claws without the drama is a skill, not luck, and it starts with the right setup and a calm approach.
This guide walks you through the best way to trim cat claws at home, step by step, including how to hold your cat, where to cut on the nail, and how to avoid the quick (the pink part that bleeds if you nick it). You’ll also get a clear answer on how often to trim cat claws, plus tricks for handling a squirmy or unwilling cat so you both get through it in one piece.
A cat that scratches you during nail trims is often the same cat scratching up your couch out of stress or instinct, and it helps to understand why cats scratch furniture in the first place. If furniture damage is your bigger headache, our guide on how to stop a cat from scratching furniture tackles that problem directly, but for now, let’s get those claws trimmed safely and without the fight.
Why and how often to trim your cat’s claws
Untrimmed claws don’t just shred your couch cushions, they curl back into the paw pad if left too long, causing pain and even infection. Regular claw trims also cut down on accidental scratches when your cat kneads your lap or startles awake from a nap. Indoor cats especially need this help since they don’t wear their nails down naturally on rough outdoor surfaces the way outdoor cats do, which is also why a good scratching post earns its keep indoors. So yes, can you trim cat claws yourself at home without a vet visit? Absolutely, and most owners find it far cheaper and less stressful once they get the hang of it.
A cat with regularly trimmed claws is calmer to handle, safer around kids, and gentler on your furniture.
How often should you trim your cat’s claws
The honest answer to how often trim cat claws depends on the cat, but most adult cats need a trim every 2 to 3 weeks. Kittens grow claws fast and benefit from weekly checks, while senior cats with thicker, slower-growing nails can sometimes stretch to every 4 weeks.
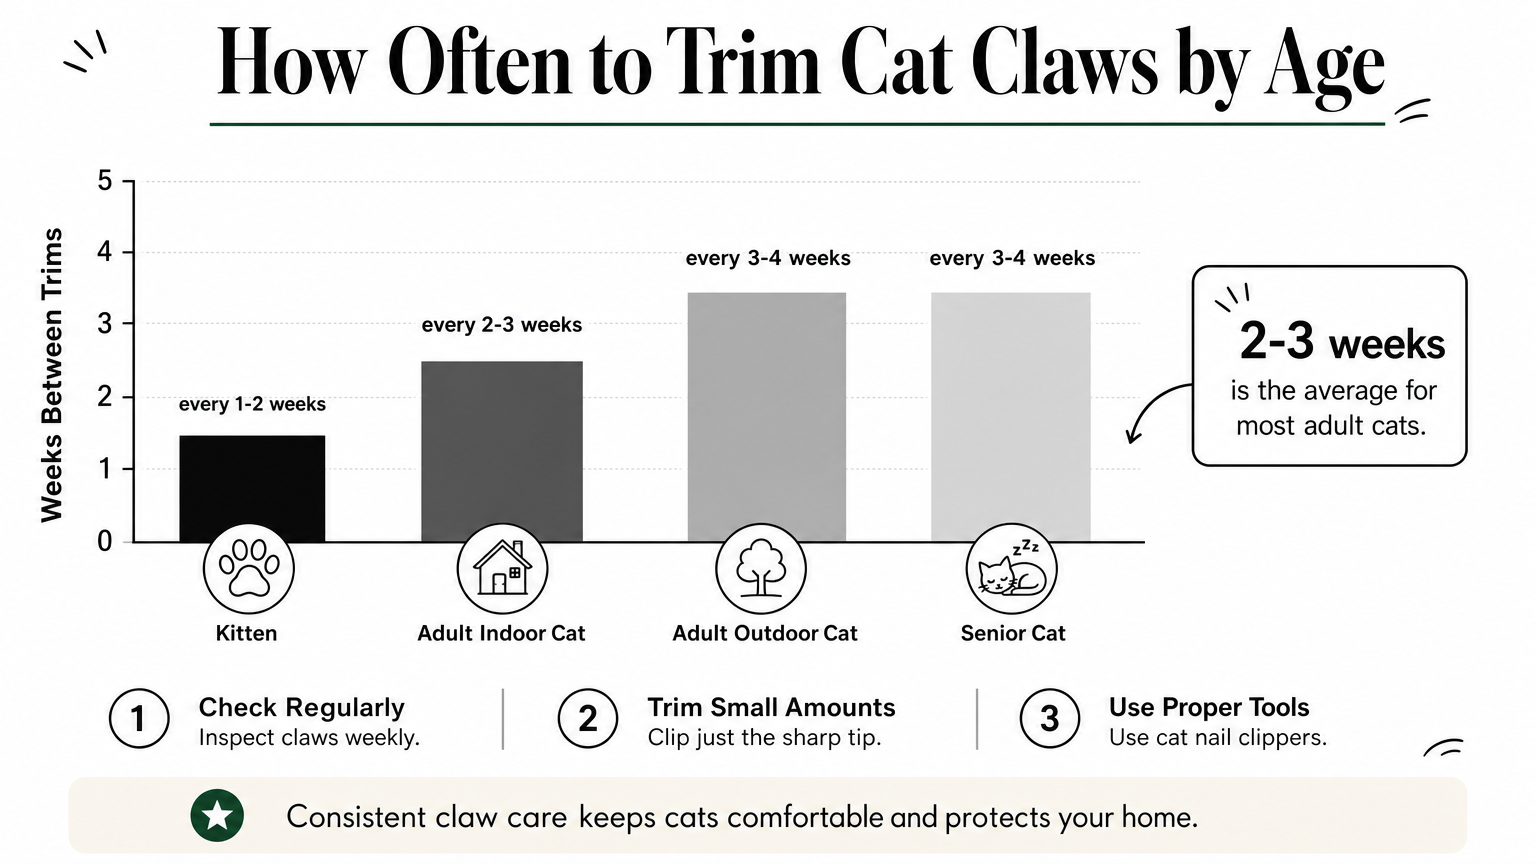
| Cat type | Trim frequency |
|---|---|
| Kitten (8-16 weeks) | Every 1-2 weeks |
| Adult indoor cat | Every 2-3 weeks |
| Adult outdoor cat | Every 3-4 weeks |
| Senior cat | Every 3-4 weeks |
If you’re still asking how often should you trim your cat’s claws in your specific case, just watch the tips: once they curve past the paw pad or start catching on carpet, it’s time. Building this into your calendar, rather than waiting for a scratch to remind you, keeps the job quick and low-stress for both of you.
Step 1. Gather your tools and prep your cat
Before you touch a single claw, set yourself up for success. Trimming cat claws with nail clippers goes much smoother when everything is within arm’s reach and your cat isn’t already agitated.
The fight usually starts before the clippers even open, so prep matters more than technique.
Grab these essentials:
- Cat-specific nail clippers (guillotine or scissor-style, never human clippers)
- Styptic powder or cornstarch, in case you nick the quick
- A few high-value treats
- A soft towel for wrapping a wriggly cat
- Good lighting so you can see the quick clearly
Once your supplies are laid out, pick a moment when your cat is naturally sleepy or relaxed, right after a meal or during a lazy afternoon nap works well. Avoid chasing them down mid-play. If this is your first attempt at how to trim cat claws at home, spend a day or two just handling their paws gently and rewarding calm behavior. That groundwork alone solves half the battle of how to trim cat claws without getting scratched.
Step 2. Get your cat into a comfortable position
Position matters as much as the clippers themselves. Settle into a chair with your cat facing away from you, tucked against your body like a football, so their paws face outward and you can see each claw clearly. Getting your cat comfortable here means keeping your movements slow and your grip firm but relaxed, cats pick up on tension fast and will squirm harder if you tighten up.

A relaxed hold beats a tight grip every time, since cats mirror the energy of the person holding them.
If your cat resists sitting in your lap, try the towel-wrap method instead. Lay a towel flat, place your cat in the center, and fold the sides over their body like a burrito, leaving one paw exposed at a time. This works especially well for trim cat claws sessions with cats who hate restraint but tolerate short bursts of handling. Press gently on the top and bottom of a paw pad to extend the claw, and press directly on the toe, not the leg, so your cat doesn’t associate the whole limb with discomfort. Talk in a low, steady voice throughout, and stop the moment you sense real distress rather than pushing through it.
Step 3. Find the quick and trim each claw
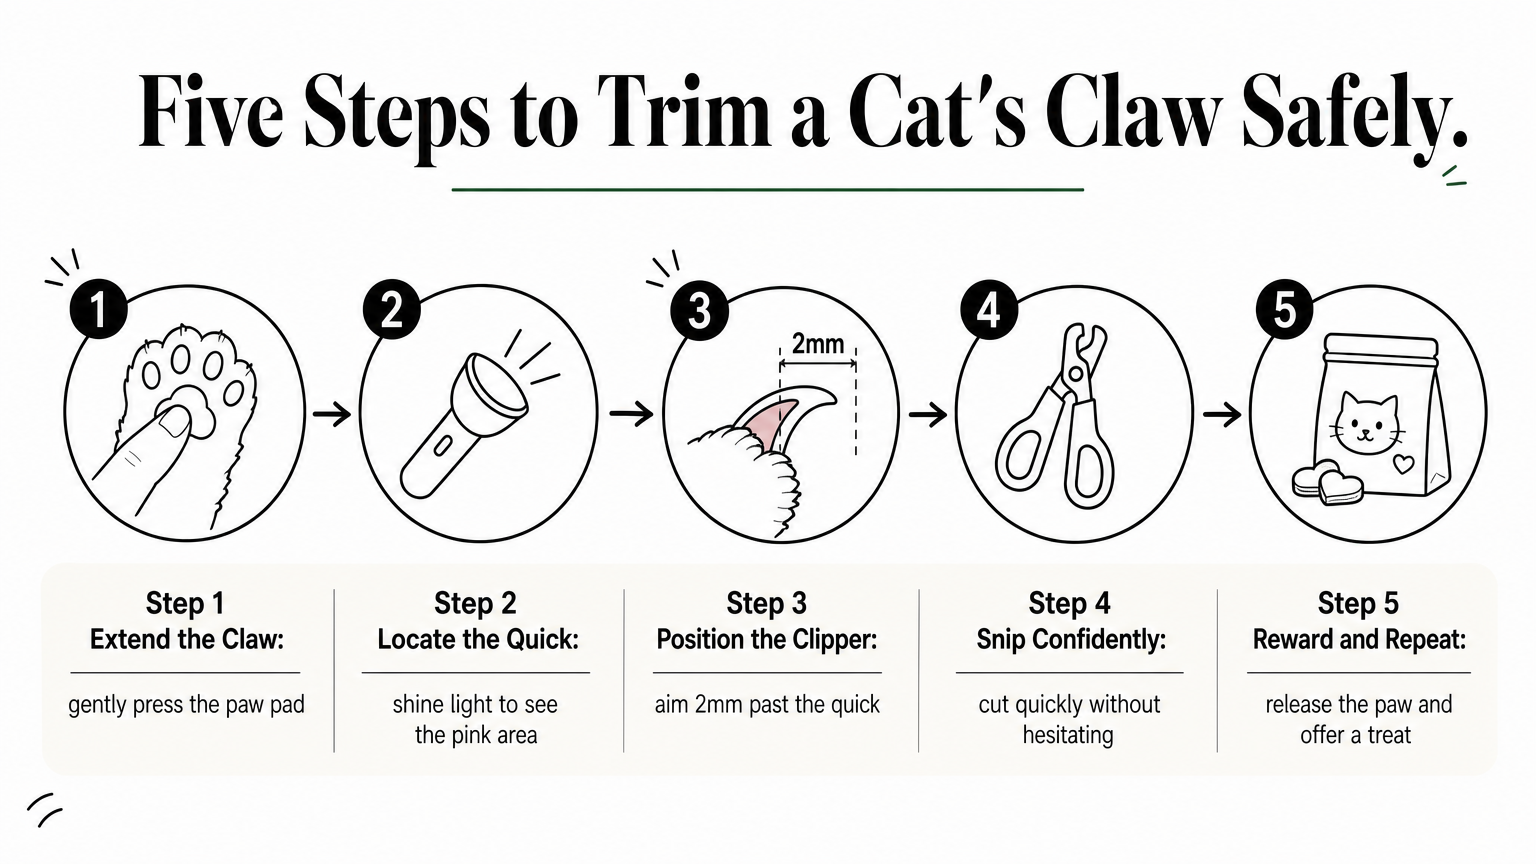
Once you’ve extended a claw, look for the quick, the pink triangle of blood vessels and nerve endings running through the center of the nail. On light-colored claws, this is easy to spot; on dark claws, shine a flashlight from behind the paw so the pink glow shows through. This is exactly where to trim cat claws safely: always aim for the clear, curved tip well ahead of that pink area, never anywhere close to it.
Cutting a little too conservative beats cutting a little too close, every single time.
Here’s the simple sequence for easy cat nail trimming:
- Extend the claw with gentle pressure on the paw pad
- Locate the quick using good light or a flashlight
- Position the clipper blade about 2mm past the quick
- Snip quickly and confidently, no hesitating mid-cut
- Release the paw, offer a treat, and move to the next claw
If you’re wondering how do you trim cat claws without second-guessing every snip, this routine removes the guesswork. Work through one or two paws per session if your cat gets restless, then finish the rest later that day or the next.
Step 4. Handle squirming, scratches, or bleeding
Even with the best prep, some sessions go sideways. A cat that suddenly thrashes is telling you something, usually that you’re pressing too hard or lingering too long on one paw. Stopping immediately when squirming starts, rather than fighting to finish that nail, teaches your cat that struggling ends the session faster than staying calm does.
The cat who learns that calm behavior ends the trim faster will fight you less next time.
Scratches happen even to experienced owners, so don’t take it personally or escalate your grip in response. Set your cat down, let them walk away, and try again in a few hours once everyone’s settled.
If you nick the quick
Bleeding looks alarming but is rarely serious. Here’s what to do:
- Press styptic powder or cornstarch directly onto the tip of the claw
- Hold gentle, steady pressure for 30 seconds
- Keep your cat still and calm until bleeding stops
- Skip the remaining claws for that session
Most bleeding stops within a minute. Trim cat claws with nail clippers designed for cats, not guesswork with human tools, and this kind of nick becomes rare after your first few sessions.
Making nail trims part of your routine
Once you’ve gone through a few sessions, trimming cat claws stops feeling like a battle and becomes just another small habit, like feeding or brushing. Pick a day every two to three weeks, pair it with something your cat already enjoys, and you’ll notice less resistance each time. Consistency matters more than perfection here: a slightly uneven trim beats a skipped one that lets claws curl back into the paw pad.
Still, claws are only half the story. Cats scratch furniture for the same instinctive reasons they need regular trims, and no amount of clipping fixes a couch that’s already become their favorite scratching spot. If that’s your next battle, read our Scratch-Free in 7 Days review to see how the program redirects that instinct for good, without punishment, sprays, or declawing. Handle the claws, solve the scratching, and get your furniture and your sanity back.